
Contouring and highlighting have become a staple in makeup artistry, allowing you to sculpt the face and create a more defined structure. However, there’s a fine line between creating a beautiful, sculpted look and ending up with harsh, unblended lines. Advanced contouring and highlighting techniques go beyond the basics of placing a dark contour on the cheekbones and a lighter highlight on the high points of the face.
Key Tips:
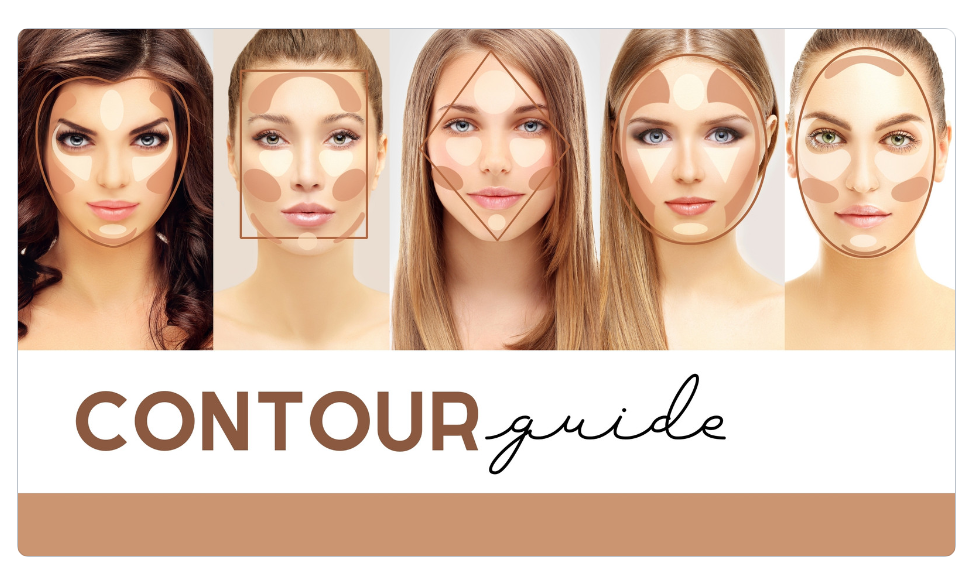
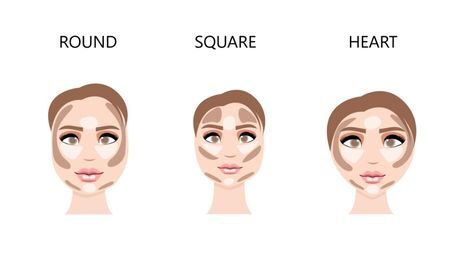
- Know Face Shapes: Contouring should be tailored to each client’s face shape. For example, square faces may need more contouring along the jawline to soften the angles, while round faces may benefit from contouring along the sides of the face to create length.
- Cream vs. Powder: Cream contour products provide a more seamless finish, particularly for dry skin. Powder products work well for oily skin types but can sometimes look cakey if not blended properly.
- Layering: Apply a thin layer of cream contour and blend it well before layering powder over it. This creates a natural, soft finish that won’t look too heavy.
- Highlighting: Use highlighting to accentuate the high points of the face, such as the tops of the cheekbones, brow bones, the bridge of the nose, and the cupid’s bow. Avoid over-highlighting to maintain a balanced look.
Advanced Tip: Use a sponge to blend contour and highlight products together, ensuring the makeup melds into the skin and looks like it’s part of the face rather than sitting on top of it.
2. Perfecting the Cut Crease
The cut crease technique is a favorite among professional makeup artists for its ability to create dramatic eye looks. By creating a sharp contrast between the eyelid and the crease, this technique adds dimension and depth to the eyes, making them appear larger and more defined.
Key Tips:
- Precision: The key to a perfect cut crease is precision. You need to define the crease with a bold shadow, then “cut” it using a concealer or eyeshadow primer to create a clean, defined line.
- Blending: After cutting the crease with concealer or a white eyeshadow base, make sure to blend the edges well to avoid harsh lines. The contrast should be sharp, but the transition between the cut crease and the rest of the lid should be soft and blended.
- Shimmers and Matte Shades: Add a shimmering shadow to the lid for a more dramatic effect. Matte shades work best for the crease to give the look depth and dimension.
- Use of Tools: A flat concealer brush or a small, firm shader brush is perfect for achieving the precision required for a cut crease.
Advanced Tip: Experiment with color on the lid. While neutral tones are popular, using bright colors in the cut crease (like blues, purples, or metallics) can make the look even more striking.
3. Mastering Eyeliner Techniques
Eyeliner is a fundamental part of any makeup look, but mastering advanced eyeliner techniques can truly elevate your work. From classic winged eyeliner to more dramatic graphic liner styles, these techniques allow you to play with shape and style.
Key Tips:
- Winged Eyeliner: The classic cat-eye winged eyeliner is a must-have skill. Ensure that the angle of the wing complements the client’s eye shape. A good tip is to follow the lower lash line as a guide for the angle of the wing.
- Graphic Eyeliner: Experimenting with bold, graphic eyeliner shapes—such as double lines, floating eyeliner, or geometric designs—can add a modern twist to your makeup looks. This is especially popular in editorial and fashion makeup.
- Tightlining: Tightlining is a technique where you line the waterline to define the eyes without showing eyeliner on the lash line. This is a great technique for clients who want a more natural, subtle look but still want to define their eyes.
- Smudged or Smoked-Out Eyeliner: Smudged eyeliner is ideal for creating sultry, smoky eye looks. Use a pencil or gel liner and blend it out with a brush to create a soft, diffused effect.
Advanced Tip: Use gel eyeliners for sharper, more defined lines. If you’re going for a softer look, try using pencil liners and smudging them for a more blended finish.
4. Lash Lifting and Lash Extensions
Lashes have become a central focus of many makeup looks, and being skilled in lash lifting or applying extensions can make a significant difference in your artistry. Mastering these techniques will allow you to create long, voluminous lashes that perfectly complement any makeup look.
Key Tips:
- Lash Lifting: Lash lifts curl and lift natural lashes, creating the appearance of longer, more voluminous lashes without the need for extensions. A lash lift is a great option for clients who prefer a more natural look.
- Lash Extensions: Eyelash extensions can take your work to the next level by adding volume and length. Be sure to customize the length and thickness of the lashes based on the client’s natural lashes and eye shape. Overly thick or long extensions can weigh down the natural lashes.
- Faux Lashes: For a temporary effect, faux strip lashes are a quick fix. Understanding the different types of lash strips (e.g., natural, dramatic, voluminous) allows you to choose the right set for any occasion.
Advanced Tip: Lash extensions require precise application, so having a steady hand is crucial. Always ensure that the extension is only glued to the individual natural lash, avoiding contact with the skin.
5. Airbrush Makeup Application
Airbrush makeup is a professional technique that involves using an airbrush gun to apply makeup in a fine mist. This method provides a flawless, even finish that’s often long-lasting and lightweight, making it ideal for special occasions like weddings or high-definition photography.
Key Tips:
- Airbrush Machines: Invest in a high-quality airbrush machine and compressor. There are different models on the market, so choose one based on your specific needs (e.g., speed, precision, and ease of use).
- Product Choice: Use airbrush-friendly foundations, blushes, and highlighters. Regular makeup products may clog the airbrush or not apply as smoothly.
- Control: Practice controlling the amount of makeup released. Airbrush makeup is about layering thin layers rather than applying a thick coat at once. You can build coverage gradually to avoid a cakey finish.
Advanced Tip: Airbrush makeup is great for creating a flawless, natural look, but it requires practice to perfect. Practice on a variety of skin types to get familiar with how the makeup looks and lasts.
6. Creative and Editorial Makeup
As an advanced makeup artist, pushing your creativity and diving into editorial and runway makeup will expand your portfolio and allow you to stand out in the industry. These looks often incorporate bold colors, unconventional shapes, and dramatic elements that showcase your creativity and technical skills.
Key Tips:
- Exaggerated Features: Play with oversized eyeliner, exaggerated contouring, or bold lip colors. Editorial makeup allows you to push the boundaries of traditional beauty.
- Color Theory: Use color theory to create contrast, harmony, and balance in your looks. Complementary colors (like blue and orange or purple and yellow) make for dynamic combinations that can catch the eye.
- Textures: Experiment with different textures, such as glitter, rhinestones, and even metallics, to add dimension and interest to your look.
Advanced Tip: Editorial makeup is about storytelling. It often works best with strong, striking themes. Whether it’s inspired by a specific era, a fashion trend, or abstract art, make sure your makeup tells a visual story.
Conclusion:
Mastering these advanced makeup techniques will set you apart as a professional makeup artist and allow you to create diverse, stunning looks for your clients. Makeup artistry is about constantly evolving, experimenting with new ideas, and refining your skills. By incorporating these advanced techniques into your repertoire, you’ll be prepared to take on any challenge and continue pushing the boundaries of beauty.
Ready to take your makeup artistry to the next level? Keep practicing, stay inspired, and never stop learning—because there’s always something new to discover in the world of makeup!